Pillows may seem like an unusual form of wedding decor, but our venue has a number of long, plain wooden benches. Adding groupings of pillows will, I hope, create some pops of color as well as soften up the modern lines of the venue’s interior space. Plus, my mother Margaret is a quilter extraordinaire, and I love sewing and fabric arts. Designing and making pillows is a great way for us to collaborate across the miles and share in the fun of the wedding-as-creative-canvas. I also plan to re-purpose some of the pillow covers for home decor after the wedding—another good reason to choose wedding colors reflective of those I love and live with every day. To save money as well as storage space, we’re creating slip-on pillow covers that fit pillows we already own (my blessed mother measured every throw pillow in her house). Each pillow cover we create for the wedding will be one-of-a-kind.
For the pillows featured here, Mom purchased a suite of fabrics online and supplemented from her stash. Most of the fabrics are from the Happiness, Blossoming, and Journeys collections by Kathy Davis for Free Spirit fabrics. I drew the (very rough) sketch to illustrate what I envisioned, a pillow featuring multiple fabrics in stripes of uneven widths. Using my sketch and the fabrics she’d selected, Mom created the beautiful pillow in the rocking chair shown in the large photo, above. The orange fabric, from the Happiness collection, is called “Sweet Words” and features words like “happiness,” “joy,” and “beauty.” Perfect for a wedding celebration!
Our Process
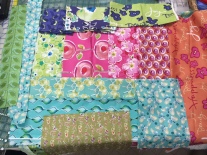
Both my mom and I tend to be inspired by the materials themselves, so for projects like this, we don’t really work from patterns, per se. Instead, for these and the other pillows we’re making, we determine the size of the pillow we want, then lay out different fabrics, folding them in various combinations, until we find something that works. The first photo, above, featuring the reddish-orange flowers on a blue background, illustrates the fold-and-find design process. Let’s say we’re working on a 14-inch square pillow similar to the one in the middle picture. The process goes something like this:
- Try out different combinations using the “fold-and-find” method. For this pillow, we selected “Pinwheel” and “Butterfly Roundup” in aqua from Kathy Davis’s Blossoming collection, and “Marbleous” by Robert Kaufman.
- After determining the basic design, do some initial math. All seam allowances are 1/4 inch, so the front panel for a 14-inch finished pillow will need to measure 14 1/2 inches square. In a design similar to the bold flower pillow, the featured fabric will occupy about 3/4 of the pillow front, about 10 1/2 inches. Here’s the tricky part: you also have to factor in seam allowances between each of the stripes you’ll be stitching together. So if you want 10 1/2 inches of fabric to show on the finished pillow front, you have to cut an 11 x 14 1/2 piece of fabric; you’ll lose the other 1/2 inch to the two 1/4 inch seams.
- My mom’s excellent solution for managing the seam allowance math on pieced designs is to cut and sew only the first two pieces of fabric, re-measure, and thereafter cut and sew only one additional piece or stripe at a time. The cut-sew-measure-repeat sequence allows you to compare the size of the pillow-front-in-progress with the desired final size at each step. If you miscalculate in one stripe, you can simply make up for the discrepancy in the next. This technique becomes increasingly helpful the more stripes you’re piecing together.
- The narrow stripe, in our example, will need to be cut at 1 1/2 x 14 1/2 (1 inch will show) and stitched to the 11 inch piece of fabric, right sides together, with a straight stitch. Press and measure to verify. Then cut the third fabric at 2 1/2 x 14 1/2 (2 inches will be visible on pillow front) and stitch it to the narrow strip, right sides together, and press the seams flat. The pillow front piecing is complete.
- For the slip-on pocket pillow-back, take the pillow-front size (14 1/2 inches), add 2 inches (=16 1/2), then divide in
half (=8 1/4 inches). Cut two pieces of coordinating fabric 14 1/2 x 8 1/4 inches each. Fold and press one long edge of each piece under and straight stitch. Overlapping the two finished seams in the middle (the overlap will be 1 1/2 to 2 inches), pin each of the back pieces to the pillow front, right sides together. Straight stitch or serge around the perimeter of the entire pillow.
- Turn the pillow cover right-side out through the opening in the back; this is also the opening you’ll use to insert a pillow form into the finished cover. Press as needed.
- Voilà!
We’re planning groupings of three-five pillows each, so Mom created a third beautiful pillow to complement the first two. It brings in fabrics featured in both of the others as well as contrasting decorative stitching. The pieced covers still needed a “vintage” touch, so we added two different lace trims to two of the pillows. Note: it is much easier to add lace or other embellishments, whether you machine-stitch or hand-stitch them on, before you put on the pillow-back!
If you want to try your hand at pieced-pillow-cover construction, I recommend a good rotary cutter and cutting mat, and an Omnigrid rotary ruler. If you’re totally new to sewing, check out a guide like Diana Rupp’s S.E.W: Sew Everything Workshop for a guide to other basic supplies and techniques.
Have fun!


2 thoughts on “DIY Decor: Pieced Pillow Covers”