DIY Decor: Spinning Flower Cupcake Tower

wirestandfp5A while back I found this curious object at the consignment store.  I thought it was some kind of office equipment, since it had several clips attached to it, and the three baskets spun around. The baskets looked like flowers with big petals to me, and I thought with some upcycling love it would make a cute cupcake tower for the wedding.

A little research revealed that the object was, in fact, a shoe rack in its previous life. Inspiration comes from curious places sometimes! I set about rehabbing it with a new paint job first.

I disassembled the rack, then sanded the old paint off with steel wool—whoever had painted it the first time hadn’t primed the metal, so the paint came off easily. After priming with an anti-rust primer by Rust-oleum, I spray painted all parts with a Krylon paint in “Ocean Breeze” that adhered to both metal and plastic, since the basket supports were plastic.

Because the baskets were a little deep for cupcakes—I had visions of wedding guests reaching in and accidentally poking fingers in the frosting—they needed a boost, a shelf for the desserts to sit on. I purchased four 8 x 1-inch styro-foam rounds from the floral department at Michaels (four so I could use the first one as a test, which was helpful). I determined the center of each round and using a set of foam carving tools, cut each in half, then carved out a center hollow for the rack’s center pole.

After cutting, I painted each of the rounds I planned to use. I’d hoped, at first, that the paint would smooth the surface, but the styro-foam texture showed through. I looked for some pretty papers to cover the rounds, selecting a handmade blue paper with a silver filigree design for the undersides. It was a greater challenge to find something for the tops. Initially, I went with a solid deep coral.

Then, I gathered other supplies for inspiration: beads, trims, ribbons, tulle. To cover the awkwardly-shaped clips anchoring the baskets, I wove strips of orange tulle through the small inner rings of the top and bottom baskets, and strips of cotton polka dot fabric through the middle basket’s inner ring.

After layering the blue-and-silver paper under each round, I then glued the two halves of each together with hot glue. The first coral paper didn’t work, so I searched my stash and came up with two other papers to use for the tops of the rounds: the flower print is from Heidi Grace Designs’ “Cartwheel” collection, the coral print from Michaels’ “Recollections” line, in “Orange Floral.”  Then I wrapped each round with one of two different orange polka dot ribbons (by Offray) and hot glued the ribbons in place.

Then it was time for the finishing touches. I added some tulle and ribbon to the top handle, and dressed up the base with more tulle and turquoise daisy trim. 

And, of course, no cupcake tower would be complete without cupcakes!
Ready for prime time!

Ready for prime time!


For more DIY tips, check out my latest Real Bride Blogger post on bridebook:

“On Pins & Needles (& Ribbon & Glue…): Advice for DIY Brides.”

Image

DIY Decor: Fabric Flowers

My mother and I are working away on the pillows for the venue benches, and I was thrilled when we recently discovered Clover’s Kanzashi Flower Maker tools for crafting fabric flowers. We found our templates at Tuesday Morning, but my mom has also seen them at her local quilt shop. They’re really easy to use: if you can count and manage a basic needle and thread, you can create beautiful fabric flowers!

There are a variety of different kinds of flowers, and most of the templates come in sizes ranging from extra-small to large. The flowers featured here were made with the small and large “Round Petal” templates, the large “Daisy” template, and the small and large “Gathered Petal” template.

kanzashi flowers 1

Clover’s Kanzashi Flower templates

Each template comes with detailed, illustrated, and easy to follow instructions, so I’ll just note the basic process and highlight a few tips based on my work with the templates so far.

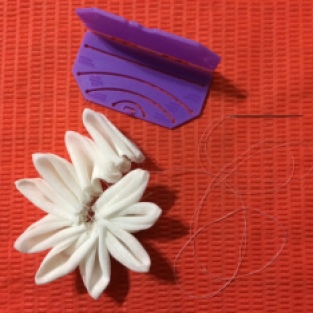
For all of the templates, the process is the same: cut your fabric into small squares (one per petal), fold the fabric into the template, then stitch the petal following the numbered template guide. The photos show a large “Gathered Petal” flower in process in a sheer white voile.

After removing the template,  pull the thread to create the petal and shape it, and then repeat with the next square of fabric. The softer the fabric, the more organic the shape.

The number of petals needed to complete a flower varies with the type of flower and template. Once you’ve completed all the petals, stitch the last petal to the first. The center will typically need to be stitched close or be covered with a button or another embellishment. Flowers of different sizes can be layered as well.

Embeliished with a bead!

Embellished with a bead!

I’ve also made a large “Daisy” in bright orange taffeta, and large and small “Round Petal” flowers in a pale aqua cotton with large white polka dots.

A few tips:

  • The back of the flower is often as pretty (or prettier) than the designated front. This was true of the orange taffeta Daisy!
  • The dimensions for the fabric squares included in the instructions are, I’ve found, always larger than needed, which results in waste. Cut one square and see how it works for you. I shaved a 1/4 to 1/2 an inch off in most cases.
  • Softer fabrics result in more organic-looking flowers, but those with a little more body are easier to shape (and hold the shape better).
  • Scissors with narrow blades like those shown above make it easier to trim close to the template.
  • Sew on pin backs to the flowers to make them easy to remove for laundering, or to re-purpose.

I’m using the flowers to embellish pillows, but they could also adorn a bag,  hat, or belt, or be worn as a brooch.

Enjoy!


You might also like to see DIY Decor: Pieced Pillow Covers for info on how we’re designing and piecing our pillows, or DIY Decor: Pillows in Progress, or Making  a Beautiful Mess for more thoughts on crafting and love.


Gallery

DIY Decor: Pillows in Progress, or Making a Beautiful Mess

When you visit a craft fair or art show, you see shelves and racks and cabinets filled with beautiful finished products. Fat colorful coffee mugs rounded to fit the cup of your hand, stunning framed photos of frozen waterfalls or birds in flight, the striking drape of a woven wool and silk scarf: their unique beauty stops you in your tracks, earns your admiration, perhaps even secures your ownership.

What we don’t see at the fair are the hours the artist spent bent over the pottery wheel, the precise balance of brute strength and fine pressure required to throw a symmetrical vessel. We don’t witness the lopsided learning curve or the moment of inattention that sends a blob of clay whirling across the studio. We don’t wait with the photographer, bug-bitten and motionless, in the field, or feel her boot crack through the ice that covers a trail of mud. We aren’t privy to the knotted tangles of thread, the beads lost under the radiator, the two discarded muslin mock-ups in the sewing room.

Or the cat who insists on helping.

Anyone who’s ever made anything knows the truth: The creative process is messy. And hard work makes more art than does inspiration.

The same might be said of love and relationships. Continue reading

Image

DIY Decor: Vintage Finds Cakestand

This is a quick and simple project, and a great way to create a unique pedestal cakestand that will (ahem) “elevate” your wedding (or holiday) pies, cakes, or cookies!

A few weeks ago in “Perfectly Imperfect,” I shared some of the thrift store finds I’m re-habbing to use as part of our wedding decor. First up, turning mystery object #7 and plate #2 into a cakestand with character. For those of you (still) wondering: mystery object #7 is a vintage toothbrush holder! It was obviously in need of a coat of paint, so I selected Valspar Signature, satin finish, in “Trolley” to coordinate with our wedding colors. (Note: A lot of hardware and home stores now mix and sell half-pint sample sizes, which makes it easy to purchase just the right color for a small project.) Continue reading

Gallery

Perfectly Imperfect: Beauty, Brokenness and DIY Decor/Before

“Imperfection is beauty, madness is genius, and it’s better to be absolutely ridiculous than absolutely boring.” -Marilyn Monroe

Perhaps one reason I resist aspiring to perfection is my long-time love of vintage and antique goods. Perfection is a shiny veneer, pretty enough to look at, but usually a temporary state—and, frankly, a little boring. Wear and tear tells a story: a little rust lends a venerable charm, a few dings show an object was used and valued, a crooked hand-sewn seam or repair imbues an inanimate linen with tangible humanity. The Online Etymology Dictionary describes the root of “imperfect” as deriving from the “mid-14c., imperfite, from Old French imparfait, from Latin imperfectus ‘unfinished, incomplete’.” All of the imperfect objects in the gallery, above, were found at thrift, consignment, or antique stores, and all will become part of our wedding decor. When I look at them, I see the beauty in their imperfections, and the possibilities in that beauty. They are indeed “unfinished and incomplete,” though my goal is not to “perfect” them, only to highlight their inherent loveliness and enhance it by finding fresh uses for familiar things.

“To banish imperfection is to destroy expression, to check exertion, to paralyze vitality.” – John Ruskin

Continue reading

Gallery

DIY Decor: Pieced Pillow Covers

Pillows may seem like an unusual form of wedding decor, but our venue has a number of long, plain wooden benches.  Adding groupings of pillows will, I hope, create some pops of color as well as soften up the modern lines of the venue’s interior space. Plus, my mother Margaret is a quilter extraordinaire, and I love sewing and fabric arts. Designing and making pillows is a great way for us to collaborate across the miles and share in the fun of the wedding-as-creative-canvas. I also plan to re-purpose some of the pillow covers for home decor after the wedding—another good reason to choose wedding colors reflective of those I love and live with every day. To save money as well as storage space, we’re creating slip-on pillow covers that fit pillows we already own (my blessed mother measured every throw pillow in her house). Each pillow cover we create for the wedding will be one-of-a-kind.

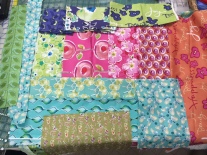
For the pillows featured here, Mom purchased a suite of fabrics online and supplemented from her stash. Most of the fabrics are from the Happiness, Blossoming, and Journeys collections by Kathy Davis for Free Spirit fabrics. I drew the (very rough) sketch to illustrate what I envisioned, a pillow featuring multiple fabrics in stripes of uneven widths. Using my sketch and the fabrics she’d selected, Mom created the beautiful pillow in the rocking chair shown in the large photo, above. The orange fabric, from the Happiness collection, is called “Sweet Words” and features words like “happiness,” “joy,” and “beauty.” Perfect for a wedding celebration!

Our Process

Continue reading