DIY Decor: Spinning Flower Cupcake Tower

wirestandfp5
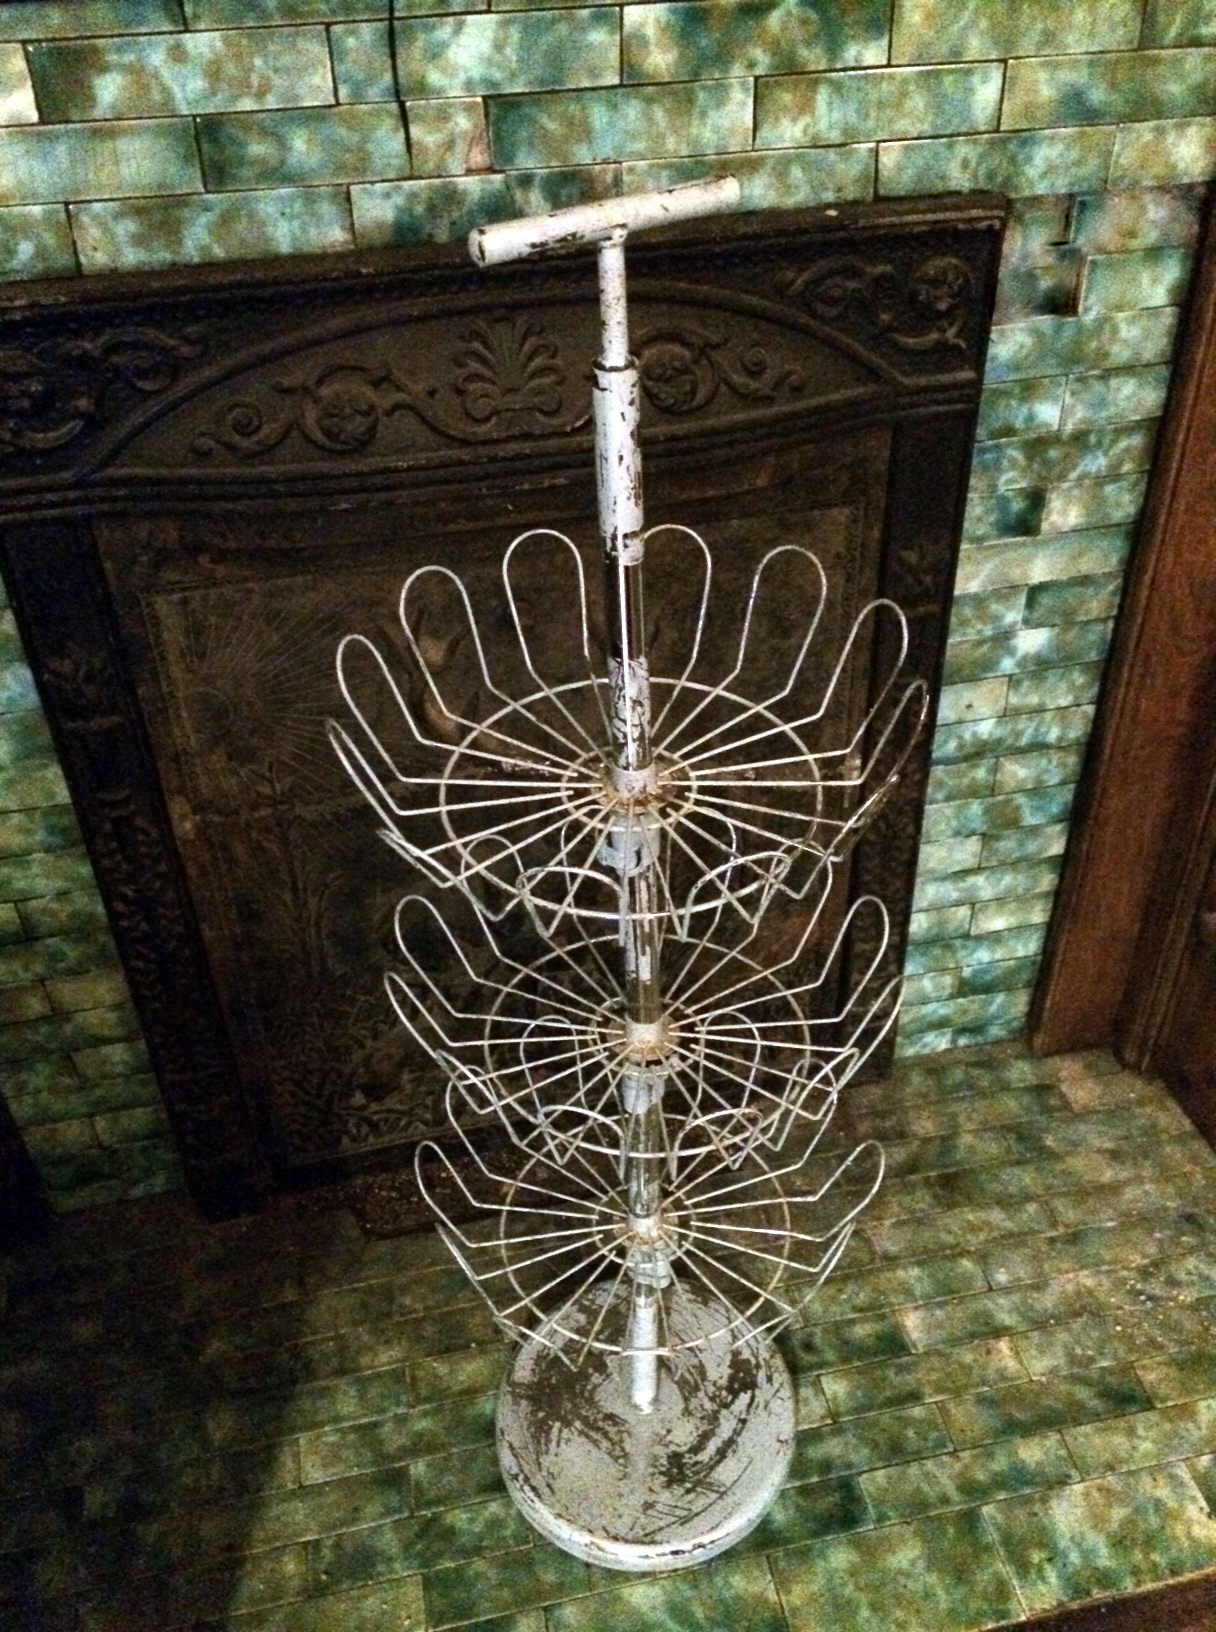
A while back I found this curious object at the consignment store.  I thought it was some kind of office equipment, since it had several clips attached to it, and the three baskets spun around. The baskets looked like flowers with big petals to me, and I thought with some upcycling love it would make a cute cupcake tower for the wedding.

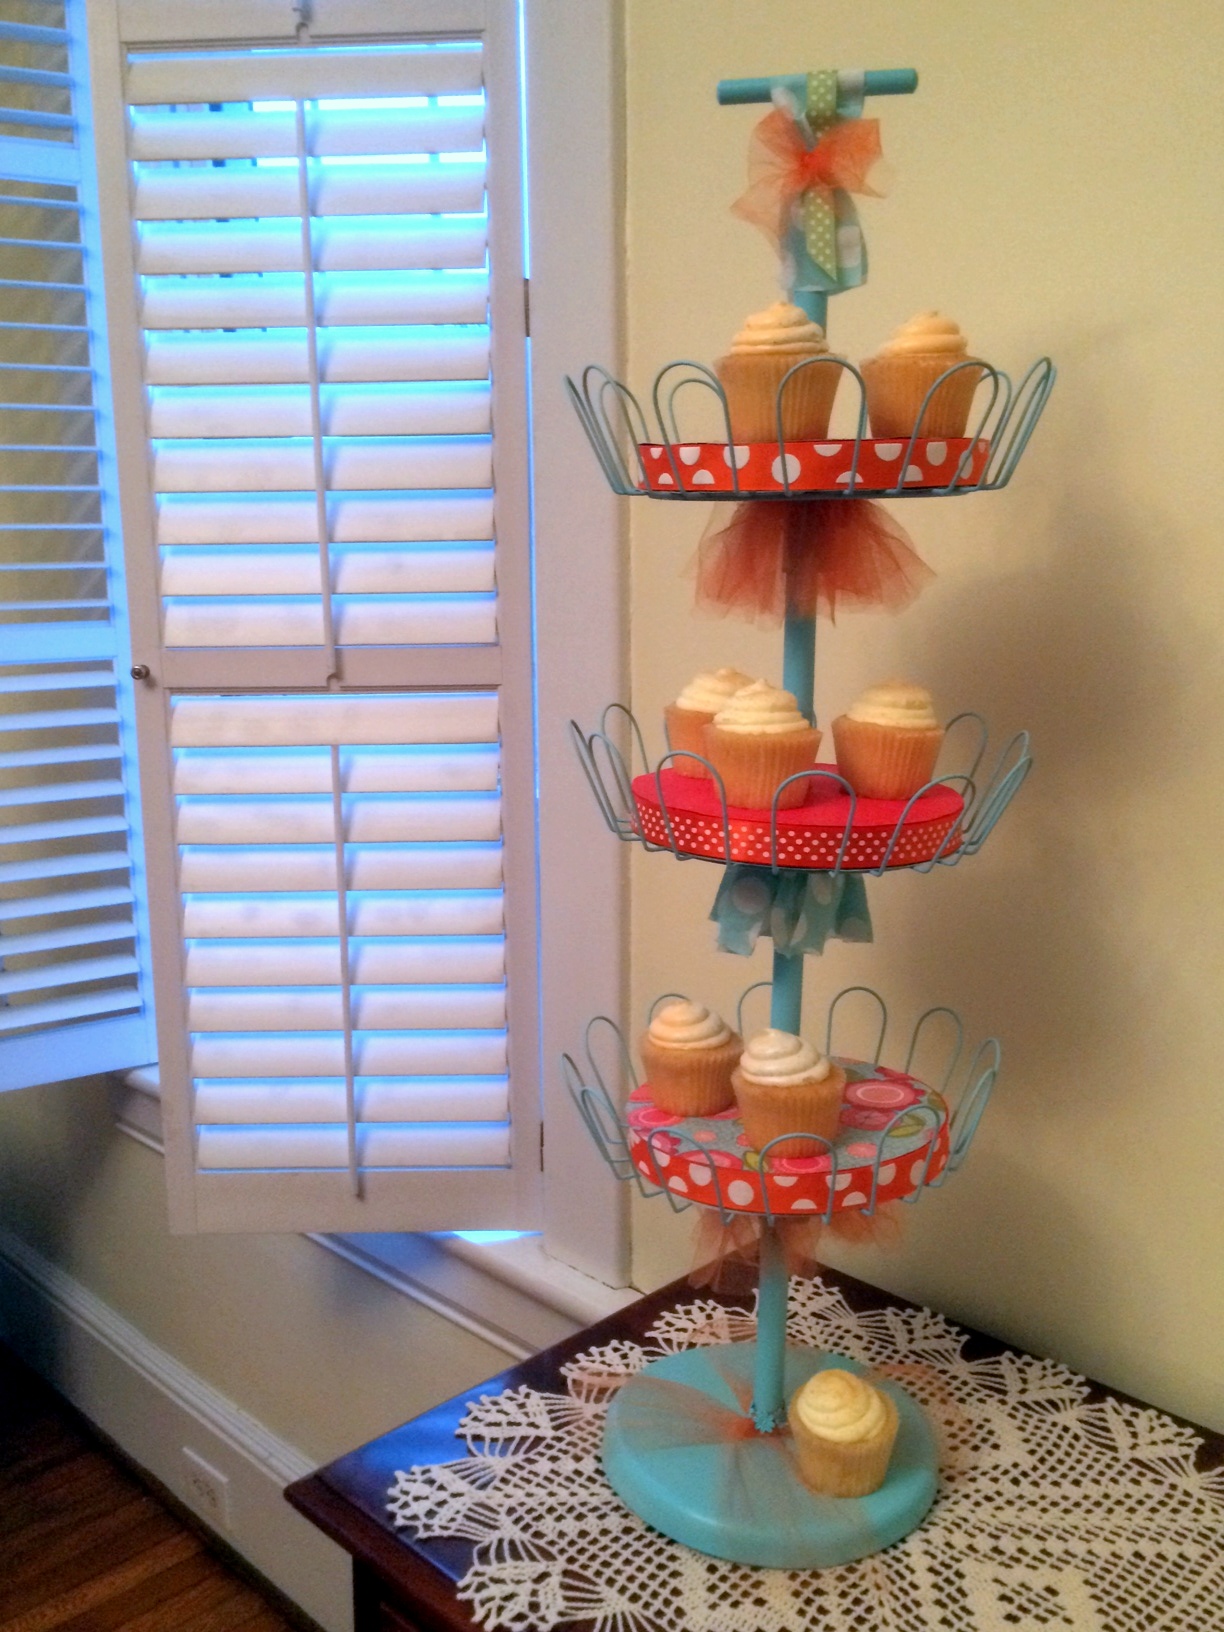
A little research revealed that the object was, in fact, a shoe rack in its previous life. Inspiration comes from curious places sometimes! I set about rehabbing it with a new paint job first.

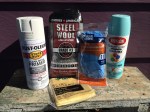
I disassembled the rack, then sanded the old paint off with steel wool—whoever had painted it the first time hadn’t primed the metal, so the paint came off easily. After priming with an anti-rust primer by Rust-oleum, I spray painted all parts with a Krylon paint in “Ocean Breeze” that adhered to both metal and plastic, since the basket supports were plastic.

Because the baskets were a little deep for cupcakes—I had visions of wedding guests reaching in and accidentally poking fingers in the frosting—they needed a boost, a shelf for the desserts to sit on. I purchased four 8 x 1-inch styro-foam rounds from the floral department at Michaels (four so I could use the first one as a test, which was helpful). I determined the center of each round and using a set of foam carving tools, cut each in half, then carved out a center hollow for the rack’s center pole.

After cutting, I painted each of the rounds I planned to use. I’d hoped, at first, that the paint would smooth the surface, but the styro-foam texture showed through. I looked for some pretty papers to cover the rounds, selecting a handmade blue paper with a silver filigree design for the undersides. It was a greater challenge to find something for the tops. Initially, I went with a solid deep coral.

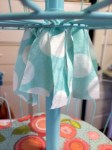
Then, I gathered other supplies for inspiration: beads, trims, ribbons, tulle. To cover the awkwardly-shaped clips anchoring the baskets, I wove strips of orange tulle through the small inner rings of the top and bottom baskets, and strips of cotton polka dot fabric through the middle basket’s inner ring.

After layering the blue-and-silver paper under each round, I then glued the two halves of each together with hot glue. The first coral paper didn’t work, so I searched my stash and came up with two other papers to use for the tops of the rounds: the flower print is from Heidi Grace Designs’ “Cartwheel” collection, the coral print from Michaels’ “Recollections” line, in “Orange Floral.”  Then I wrapped each round with one of two different orange polka dot ribbons (by Offray) and hot glued the ribbons in place.

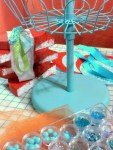
Then it was time for the finishing touches. I added some tulle and ribbon to the top handle, and dressed up the base with more tulle and turquoise daisy trim. 

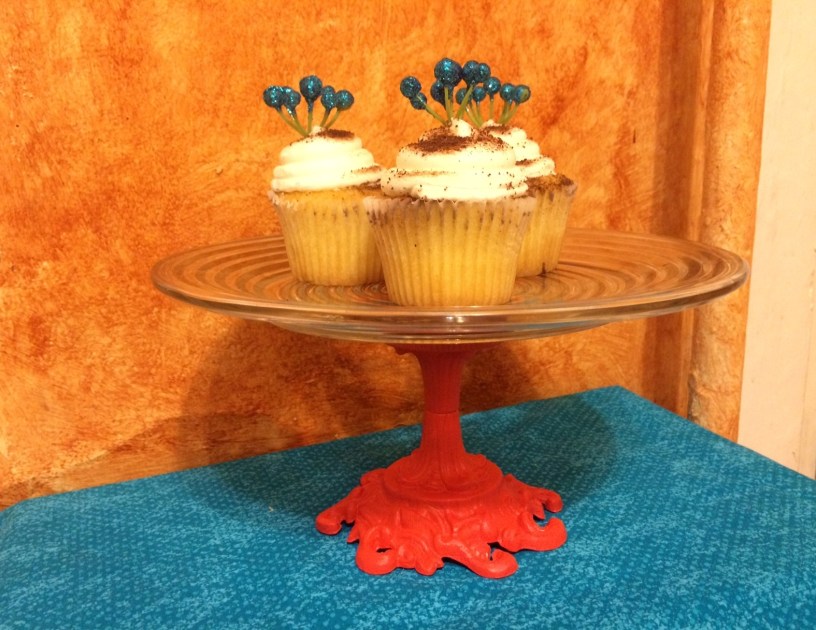
And, of course, no cupcake tower would be complete without cupcakes!

Ready for prime time!

Ready for prime time!


For more DIY tips, check out my latest Real Bride Blogger post on bridebook:

“On Pins & Needles (& Ribbon & Glue…): Advice for DIY Brides.”

Image

DIY Decor: Easy Aisle Markers

I’ve been DIYing up a storm of late, working on a variety of wedding projects. One project has been aisle markers and ceremony markers. We’ve opted not to have a wedding arch, as we want the mountains in the background to frame our ceremony. But we still wanted something to define both the start of aisle, where guests will enter to take seats, as well as the ceremony space.

Traditional white columns were too formal, so I kept my eyes open for other options. Ultimately, I chose two sets of metal plant stands and set about transforming them into something with a bit more color and whimsy.

Step 1: Prime and paint plant stands

I selected two brown plant stands for the aisle markers. The flower shape on top echoes a daisy. I also liked the second ring just a few inches from the top, as I had plans for it.

I had Rust-oleum Clean Metal Primer on hand from another project, so I started with it and got a solid base coat on. Then I painted the stands with Rust-oleum Painters Touch Ultra Cover (which also has a primer) in Heirloom White, satin finish.

Step 2: Gather fabric and beading tools and supplies

I gathered the rest of my supplies: ribbon in different textures and colors, lace, and several fabrics to cut into strips, along with beads, head pins, and basic jewelry making tools—round-nose and chain-nose pliers, as well as wire-cutters.

Step 3: Assemble bead dangles

I assembled the six bead dangles first. The design of the plant stand would allow up to nine on each stand, but I opted for the simpler (and less time consuming) three. If I have time to add more as we get closer to the wedding, I can.

These bead dangles each required one silver-toned headpin, one ceramic aqua bead, two small round aqua “bubble-glass” beads, and two aqua 3-4 mm bicone crystals. Any combination of beads that pleases will work.

After threading beads onto the head pin, create a wire loop using the round-nosed pliers, wrap the tail of the wire, and trim. I tied the dangles onto the plant stand with narrow aqua ribbon. They could also be attached with wire.

Note: Michaels and other craft stores stock a lot of pre-made pendants and dangles these days, so you can probably purchase something you like if you’d rather not make it, or don’t have the tools.

Step 4: Cut fabric strips, ribbon, and lace to desired length. Thread onto the plant stand in a repeating pattern.

This is what gives the plant stands a column-like effect. Cut each ribbon or strip of fabric twice the length you want it to hang, plus about 1 1/2 inches. I kept the width to about 1-inch, with a little variation. Fold in half, pull the folded loop over the second ring, thread the two ends through the loop, and pull it snug. Putting the loop to the outside looks a little more formal, like a man’s necktie; I preferred it to the inside.

I like the wispiness of the loose ties, but if you wanted an even more structured look, you could wrap or tie the ribbons around the bottom ring so that they were taut and stayed in place.

Step 5: Place alongside the aisle and enjoy!

I added a little lace to the top, too, though I’m still debating whether I like it.  These two whimsical “columns” will greet our guests as they take their seats. The finished ceremony markers I’m keeping a surprise. 🙂

finished_aisle_markers

All beading supplies and Celebrate 360 ribbons available at Michaels. All lace and fabrics except dupioni silk and velveteen from JoAnn Fabric and Crafts; silk and velveteen from local antique store and my stash, respectively. Primer and paint available at Lowe’s. Featured plant stands purchased at Tuesday Morning.

Love, Lace, & Satin: A (Family) Affair to Remember

♥ ♥ ♥

Mom in her wedding gown

Mom in her wedding gown

My mother Margaret designed and made the ring pillow Steve and I will use in our wedding ceremony. It’s made from her taffeta wedding dress and lace from the Watteau train of her dress.

My mother was teeny-tiny when she married my father, and the material of her dress had become so delicate that even if I were able to fit into it (which I haven’t been, since I was maybe 16), it wouldn’t have been possible to wear it anyway.

Grandma's blue dress

Grandma’s blue dress

There is also a piece of satin in the pillow from my maternal grandmother’s wedding dress, which was Yale-blue, since my grandfather was a graduate. The satin had faded, so it is incorporated in the pillow as a liner under the white taffeta.

I love the way the pillow pays tribute to generations of mothers and daughters: my mother made her daughter a ring pillow from fabric worn in her own and her mother’s wedding.

Our ring bearer

With our ring bearer

I don’t have a daughter myself to carry our pillow, and my only niece is already in college. But I’m thrilled to honor the next generation of our family by having my brother’s youngest son, my nephew Ethan, carry the pillow as our ring-bearer. With his winning smile, he just might steal the show.

This piece of our ceremony is truly a (family) affair to remember!

♥ ♥ ♥

Our wedding pillow

Our wedding pillow: a family affair!

Image

DIY Decor: Vintage Finds Cakestand

This is a quick and simple project, and a great way to create a unique pedestal cakestand that will (ahem) “elevate” your wedding (or holiday) pies, cakes, or cookies!

A few weeks ago in “Perfectly Imperfect,” I shared some of the thrift store finds I’m re-habbing to use as part of our wedding decor. First up, turning mystery object #7 and plate #2 into a cakestand with character. For those of you (still) wondering: mystery object #7 is a vintage toothbrush holder! It was obviously in need of a coat of paint, so I selected Valspar Signature, satin finish, in “Trolley” to coordinate with our wedding colors. (Note: A lot of hardware and home stores now mix and sell half-pint sample sizes, which makes it easy to purchase just the right color for a small project.) Continue reading

Gallery

Perfectly Imperfect: Beauty, Brokenness and DIY Decor/Before

“Imperfection is beauty, madness is genius, and it’s better to be absolutely ridiculous than absolutely boring.” -Marilyn Monroe

Perhaps one reason I resist aspiring to perfection is my long-time love of vintage and antique goods. Perfection is a shiny veneer, pretty enough to look at, but usually a temporary state—and, frankly, a little boring. Wear and tear tells a story: a little rust lends a venerable charm, a few dings show an object was used and valued, a crooked hand-sewn seam or repair imbues an inanimate linen with tangible humanity. The Online Etymology Dictionary describes the root of “imperfect” as deriving from the “mid-14c., imperfite, from Old French imparfait, from Latin imperfectus ‘unfinished, incomplete’.” All of the imperfect objects in the gallery, above, were found at thrift, consignment, or antique stores, and all will become part of our wedding decor. When I look at them, I see the beauty in their imperfections, and the possibilities in that beauty. They are indeed “unfinished and incomplete,” though my goal is not to “perfect” them, only to highlight their inherent loveliness and enhance it by finding fresh uses for familiar things.

“To banish imperfection is to destroy expression, to check exertion, to paralyze vitality.” – John Ruskin

Continue reading