
I’ve been DIYing up a storm of late, working on a variety of wedding projects. One project has been aisle markers and ceremony markers. We’ve opted not to have a wedding arch, as we want the mountains in the background to frame our ceremony. But we still wanted something to define both the start of aisle, where guests will enter to take seats, as well as the ceremony space.
Traditional white columns were too formal, so I kept my eyes open for other options. Ultimately, I chose two sets of metal plant stands and set about transforming them into something with a bit more color and whimsy.
Step 1: Prime and paint plant stands
I selected two brown plant stands for the aisle markers. The flower shape on top echoes a daisy. I also liked the second ring just a few inches from the top, as I had plans for it.
I had Rust-oleum Clean Metal Primer on hand from another project, so I started with it and got a solid base coat on. Then I painted the stands with Rust-oleum Painters Touch Ultra Cover (which also has a primer) in Heirloom White, satin finish.


Step 2: Gather fabric and beading tools and supplies
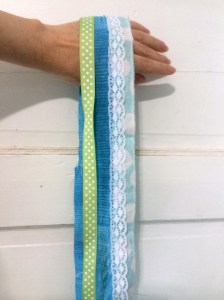
I gathered the rest of my supplies: ribbon in different textures and colors, lace, and several fabrics to cut into strips, along with beads, head pins, and basic jewelry making tools—round-nose and chain-nose pliers, as well as wire-cutters.


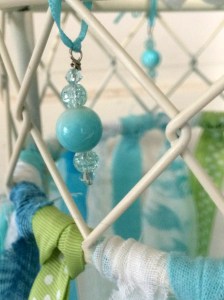
Step 3: Assemble bead dangles
I assembled the six bead dangles first. The design of the plant stand would allow up to nine on each stand, but I opted for the simpler (and less time consuming) three. If I have time to add more as we get closer to the wedding, I can.
These bead dangles each required one silver-toned headpin, one ceramic aqua bead, two small round aqua “bubble-glass” beads, and two aqua 3-4 mm bicone crystals. Any combination of beads that pleases will work.


After threading beads onto the head pin, create a wire loop using the round-nosed pliers, wrap the tail of the wire, and trim. I tied the dangles onto the plant stand with narrow aqua ribbon. They could also be attached with wire.
Note: Michaels and other craft stores stock a lot of pre-made pendants and dangles these days, so you can probably purchase something you like if you’d rather not make it, or don’t have the tools.
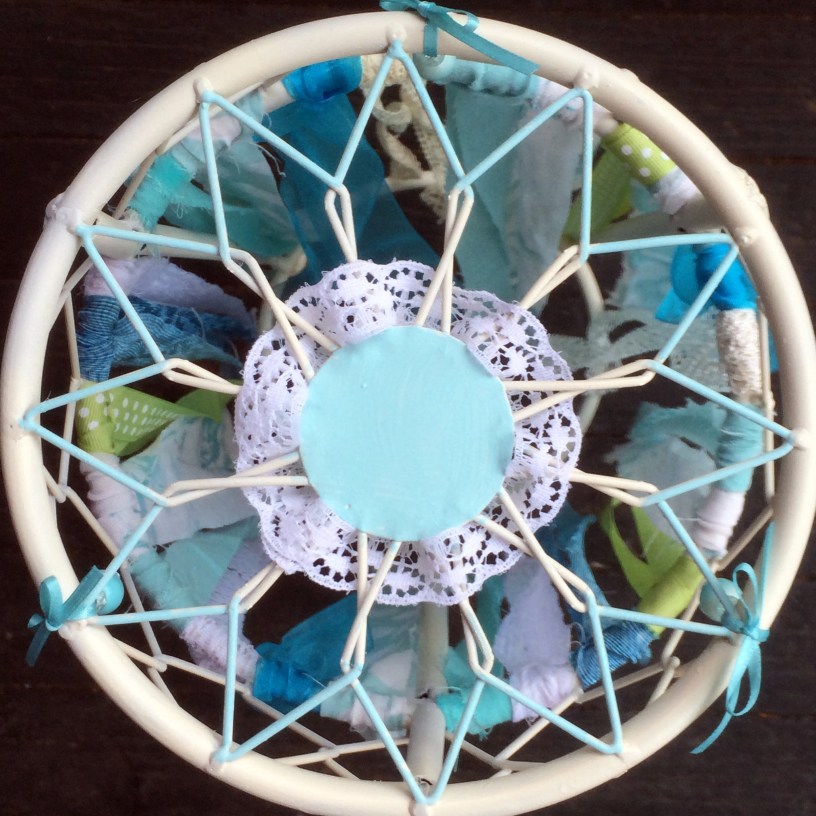
Step 4: Cut fabric strips, ribbon, and lace to desired length. Thread onto the plant stand in a repeating pattern.
This is what gives the plant stands a column-like effect. Cut each ribbon or strip of fabric twice the length you want it to hang, plus about 1 1/2 inches. I kept the width to about 1-inch, with a little variation. Fold in half, pull the folded loop over the second ring, thread the two ends through the loop, and pull it snug. Putting the loop to the outside looks a little more formal, like a man’s necktie; I preferred it to the inside.

I like the wispiness of the loose ties, but if you wanted an even more structured look, you could wrap or tie the ribbons around the bottom ring so that they were taut and stayed in place.
Step 5: Place alongside the aisle and enjoy!
I added a little lace to the top, too, though I’m still debating whether I like it. These two whimsical “columns” will greet our guests as they take their seats. The finished ceremony markers I’m keeping a surprise. 🙂

All beading supplies and Celebrate 360 ribbons available at Michaels. All lace and fabrics except dupioni silk and velveteen from JoAnn Fabric and Crafts; silk and velveteen from local antique store and my stash, respectively. Primer and paint available at Lowe’s. Featured plant stands purchased at Tuesday Morning.

Beautiful!
LikeLiked by 1 person
Thank you!
LikeLike